The Density Article Part 1 Green and Roasted Bean
Throughout our articles to date there is a constant reference to density. That’s because here at Pillar and “Bush and Bush Coffee Systems” we believe Density is the most important aspect of not only green, but also roasted coffee. We hold this view because it is the only factor that manifests through the entire roasting process from green bean, to extraction. Even so, it’s not widely quoted or tested, especially beyond the green bean state. So we thought we would spend the next few articles explaining why we believe it is so important and how to use it to learn more about coffee in general, but also espresso.
All the articles to date in the editorial section of the website, have been designed to be read together as a collective whole to give a comprehensive, “fleshed out” explanation on what happens in the espresso coffee puck. An espresso extraction is very complex, and it’s not until you break it down to individual factors, can you hope to see the parts in context to the whole. At which point we can not only get an idea of what happens in the puck, but also an understanding on how to build systems and processes to duplicate a pre-determined result. The best chance we have to develop this “system or process” begins and ends with Density. So before talking about the espresso puck we must first look at density.
What is Density?
The Concept of Density was arrived at over 2200 years ago, by a philosopher called Archimedes. A naked Archimedes ran thru the streets proclaiming his “Eureka moment”. One that was to become a defining moment in Physics History.
The Calculation of Density, D=M/V
Whereby;
D = density
M = mass
V = volume
Therefore,
Density = Mass divided by volume.
The calculation of various densities can obviously become quite complex, but in simplistic terms, we can coin a well-used phrase to explain. If we are to have two containers of identical volume, one filled with lead, the other feathers. Then whilst their volume would be the same, obviously the mass (weight) would be greater in the container of lead, so if the mass for volume is greater, the density is greater. Conversely the container of feathers, for the same volume and less mass, its overall density is less. If something exists, it has a density value. Paper, stone, dirt, water, gold, even coffee.
Coffee density measurements.
Coffee is initially measured using an international trading standard, also used for other seeds and grains, and that is, bulk density, measured in hectolitres. (expressed as hl, also sometimes written as hL, or HL)
Coffee roasters will look for this reading on the spec sheets they get from there green bean suppliers.
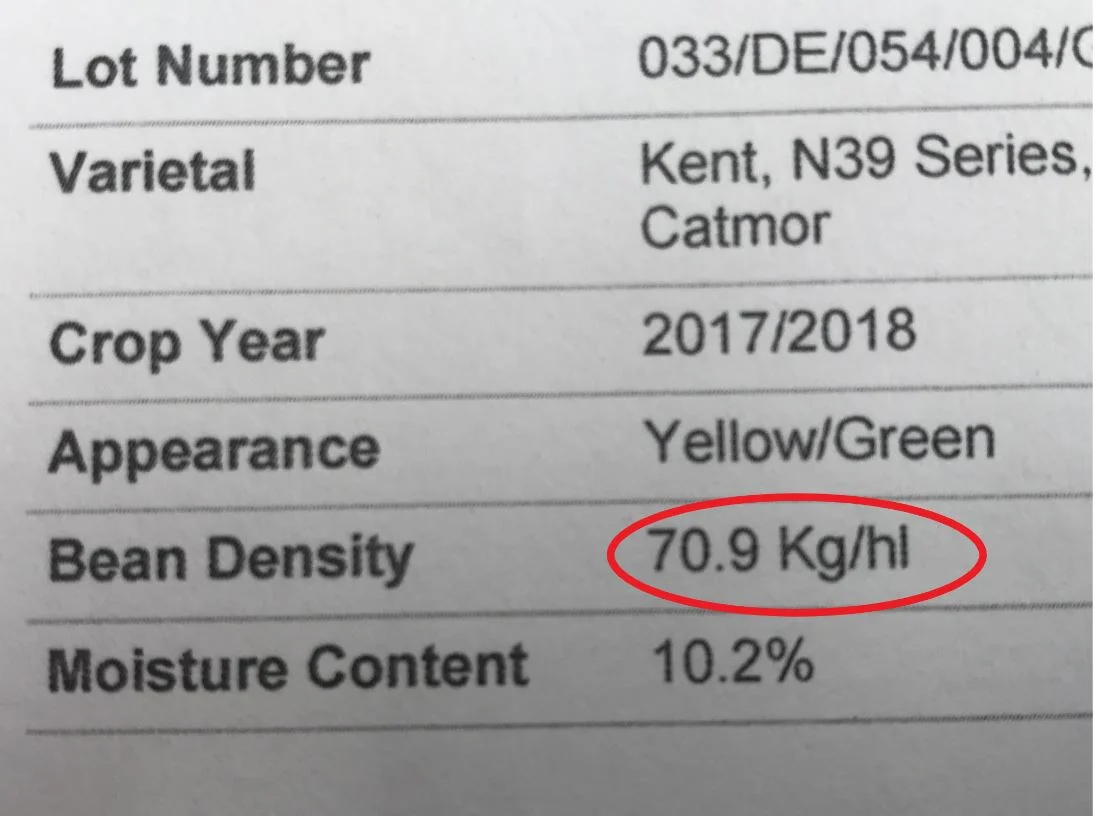
Figure 1. A typical spec sheet which shows density and moisture contents. Traditionally spec sheets would also show tasting notes, origin, farm etc. All of which we’re omitted from this example for ease of illustration.
It’s important as coffee professionals that we understand this bulk density figure as more than a number on a sheet.
So let’s look at how this figure is generated.
A hectolitre (hl) is a volume of 100 litres. So we now have the volume of our density calculation, D=M/V
Volume = 100 litres.
The next figure we need to determine for our bean density equation is mass. The term “Bulk” as its name suggests, describes a collective mass. In our case a “Bulk mass” of coffee beans.
To determine our mass figure we simply take the 100 litre container (our volume) and fill it to the top, level with green coffee beans. This collective weight of coffee beans, is our mass figure. In the example of our fact sheet in figure 1. This mass of coffee beans would weight 70.9kg for the 100 litre volume. We now have our mass figure. 70.9 kg
Not only is it a hard to do, but also impractical to measure out a 100 litre container every time you wish to take a measurement. So manufactures have designed equipment to do just that. These machines determine the density of a small sample and extrapolate it out to a 100 litre (hl) volume

figure2. Our Shore moisture meter with Bulk density reading. The meter reads the calculation of half litre sample. And multiplies out to a hectolitre (100 litre) result. In the above example. This is the green bean that accompanied our spec sheet above. As per the spec sheet it has a density reading of 70.9kg per hectolitre. Or simply 70.9 . Throughout the course of taking samples this figure may deviate slightly, depending upon the beans sampled, and your skills at taking measurements. Generally this deviation won’t be more than 1%. If it is , check your technique first and supplier second.
How to take a manual bulk density reading.

Step 1. Tare off your scale

Step 2. fll your scoop with green beans.

Step 3. Being sure to overfill your canister

Step 3. With a rounded stick, level off the beans in a sawing motion. Do not level off in one horizontal movement! The sawing motion is designed to help fill any gaps that may have resulted from your scooping action. An incorrect filling technique will give false results.

Step 4. Put the beans on your scale. Press bulk density measurement and the machine will calculate out the mass for volume figure.
WARNING
When buying a density meter, do your research, there are numerous meters on the market and I’ve seen some unbelievable figures being generated by these meters, some are just straight out wrong. The good thing about bulk density is you can check it yourself. Or better still build your own bulk density equipment. Simply get a milk container, fill it with one litre (1000 millilitres) of water, mark the water fill line with a marker and cut the top off the container to this mark. Now fill with beans. “Saw off” by the procedure above and see how many grams it weighs. Times that figure by 100 and you have a hectolitre. If the meter matches the actual reading, (to within 1%) the meter is correct. If it doesn’t,
1. check that it is actually bulk density your meter is recording. If not bulk density, what is it?
2. don’t buy the product
3. check to see if the machine needs calibration or,
4. do some more research like checking with local authorities and see if the meter has your local governments standard for weights and measures certification. (most don’t) If it doesn’t have the approval, it’s not certified, this may or may not highlight a problem with the unit.
The Elephant in the room.
But before you rush out to buy your new density meter, even if it does work, finish this article first. Unfortunately, the bulk density readings you get on your fact sheets is not a bulk density reading at all. Why? Let’s go back to our density equation.
Density = Mass divided by volume
So whilst we have all the necessities to determine bulk density, we haven’t yet determined it.
70.9kg/hl strictly speaking is not a density figure.
So let’s go one step further and determine the density.
Mass = 70.9kg
Volume = 100 litres (1 hectolitre)
Therefore
Density = 70.9 / 100
D = .709
.709 is the actual bulk density figure of these beans. Not 70.9kg/hl.
Specific gravity
Some may think that this is splitting hairs, however it’s not. This simple division has taken two measurements and reduced them to a specific gravity determination. Specific gravity is a density measurement which divides the base unit by the density of water. Water is used because, not only is it readily available but it also has the added benefit of 1 mililitre volume equalling 1 gram in weight. That is, 1000ml of water weighs 1000 grams in weight. 1000 divided by 1000 = 1. The bulk density of water is 1. Our bulk density figure above of .709 means that in a 1000 ml container these beans levelled off would weigh 709grams. Because this is in reference to water, it would be .709
In coffee, changing your density measurements to specific gravity is a simple, but very important step.
But first if you’re confused at this point, please go back and review. It is vital that you understand these calculations, because from here on out, we will be referencing all density measurements as specific gravity. Professionals of keen intellect will also start to see the benefit of this transformation, and perhaps the intent of where these articles are going. In our first ever article, (and one of the most important) “How to determine your basket volume.” We used water to determine a baskets true volume, not coffee. Then we took this one step further to determine the head space of your machine. We call this basket volume, minus the headspace figure, the Extraction Chamber Volume. When we brew espresso coffee, we do so with water in millilitres and coffee in grams. If our basket/extraction chamber volume is expressed by a water figure, it now becomes the base of all specific gravity measurements. This means we can use density for our coffee brewing, and that has far reaching effects for coffee. But we’re getting ahead of ourselves. More on this in future articles.
The problems with bulk density readings
Whilst bulk density has the benefit of a quick analysis of a beans density, (the sequence above takes less than 10 seconds to perform), even after we have converted our bulk hectolitre figure to specific gravity, this density figure still has accuracy issues. As you can see from the photos above, the issue with bulk density is that the mass figure, generated from a bulk sample of beans, has inaccuracies because of the air spaces between the beans. Airspaces that will change depending upon screen size/volume of the beans. Its therefore important to take this measurement one step further by eliminating the air spaces between the beans. Sounds complicated? It’s really not. To do this, you would begin with your traditional bulk density measurement, and then simply fill the container with water. Because this water is represented as a specific gravity measurement. 1mm =1gram, this total “water figure” is equal to the air spaces surrounding the beans. Once we take away this airspace figure (now represented as water.) with some easy calculations, we can determine one “true” mass figure and one “true” volume figure.
Confused? Imagine having a “bulk” collection of individual plasticine balls, In a container just like our container above. This would assimilate our bulk density measurement. By subtracting the airspace volume it’s like squashing all these plasticine balls together to give you one large plasticine ball which represents the total mass and volume of all the balls together.
By removing your airspaces your calculation has changed from a bulk volume of beans (bulk density) to a density figure less the “bulk” which results in simply, well…. “density”. In the absence of air spaces, this green bean density figure will climb from .709 bulk density to the vicinity of 1120grams per 1000 millilitres. By going back to our density figure we can now calculate our “true green” density.
D=M/V
Mass = 1120
Volume = 1000
Therefore 1120 divided by 1000 = 1.12
Because this figure is greater than 1 (density of water) it means that the density of green bean (minus the bulk) is greater than the density of water. Because green beans are denser than water, they should sink when placed in water, which of course they do. When green beans float in water they are considered a green bean defect.
Unlike the “bulk density” figure, which is only density at a glance, our “green density” figure, is invaluable.
Further uses for the “true” green density figure
In having a green bean density figure, by default, we also have the individual mass and the volume figures to calculate this green bean density. Most roaster operators charge their coffee roaster by Mass. For example they may charge a 30kg roaster with 25kg of green bean. That is charging by mass. However, beans vary in screen size, so this 25kg mass could result in different volumes in the drum. Think of small balloons and big balloons. A big balloon has a larger surface area than the small balloon. Because Coffee Roaster machines operate by transferring heat to the surface of a bean, by either convection or conduction. It makes sense to us to balance our drum by charging with a consistent volume, not mass, and therefore consistent heat transfer. This may help balance your drum and give consistency in your roasting which mass may not.
If you have a moisture meter at your roastery. (I strongly suggest you get one if you haven’t) you can now separate your entire bean density into moisture and bean fibre. After generating a moisture reading (say 12%) and subtracting this from the bean density, you will get further vital information. Whilst roasting, the vast majority of this moisture will leave the bean by first crack. This bean fibre mass figure, can give you an inkling of what you are left with after first crack, the lower this initial mass minus moisture figure, the less heat it will need after first crack. These simple changes to your green bean QC, together with others can help your understanding of heat transfer greatly. Especially whilst determining new profiles.
Roast density.

Figure 3. Roast density calculations. When using roast density for QC. Many different standards can be set. Roast density and expansion of coffee beans will vary depending upon your roasting style and roast degree.
Calculations determined from green bean density, can help us in decisions prior to roasting. However once charged in the drum, and the roasting begins, a process of chemical reactions take place. This process is very complex, and far beyond the scope of this article, and beyond my comprehension as a coffee roaster. But amidst of all these reactions, two main things happen which is of interest to us in density. As the green bean changes colour and mallard reactions take hold, the bean swells to various volumes which depend on the profile you chose, and its moisture decreases from say 12% to less than 2%, at the same time the green bean loses its mass. A decreasing mass and moisture, coupled with a simultaneous increase in volume, drastically lowers our bean density. How much, depends on the roast degree, and heat transfer during the roast.
Most of these changes go unseen. But all changes are crystallised once the bean hits the cooling pan. Development and mallard percentages, drying phases, roast degrees, agtrons, moisture levels, ROR (rate of rise) calculations, all are valid measurements used in the analysis of the roasting process or the roasted bean. All of these factors whether you use them or not will crystallise into a roasted bean density. This roast density is the sum total of all the processes during the roast.
Measuring of roast density.
Whilst the measurements of green density is common, though perhaps not to the extent explained in this article, the measurement of roast density is far less common. In-fact whilst I’m sure they exist, I have never met another roaster who measures it.
To measure roast density, the same tests are used as green density. This time they are performed on the roasted bean. Roasted bean mass and volume determine roast density. Together with roasted moisture % can give vital post roast analysis of how the roast progressed.
A relentless study of roast density starts to pre determine what you may find in flavour. In contrast roast curves and time temperature graphs, don’t have a physical presence, they are merely markers of heat transfer. Roast density is the resultant of heat transfer to achieve these markers. Furthermore, this density measurement will predetermine future extraction limitations. At the very least, roast density equations can be used to balance bean densities, to ensure your blends are extracted more evenly. Different roast densities will require different ground particle sizes. (Which we will cover in the next two articles) Which in turn will result in different mass figures in your basket, and most likely result in different extraction temperatures. If you want your blends to be evenly extracted, Roast density is your ticket to achieving it, through balancing densities which stabilise puck integrity.
But what about Flavour?
I remember the first time I had a discussion about physics in coffee with my brother Jake. As a process engineer my brother claimed that coffee like any other process will be governed by physics. In typical fashion, as a roaster /coffee maker, I explained that coffee is a flavour perception which is not based in physics. I must say after working with my brother on coffee with an approach half in physics and half in craft. I have come to the stark realisation that a coffee roaster (machine) does not taste, nor does an espresso machine taste the espresso it makes. Both rely on chemical reactions that are based in heat transfer. And heat transfer is based in physics. With a reluctant acceptance that my brother may in fact be right (nothing to do with physics) I now see an artesian roaster as a person who uses physics to deliver flavour. With this perspective and using density as a base, allot can be learnt about roasting and extraction. But in order to truly understand roast density we have to understand how this roast density transfers to the cup. Only then can we reverse engineer our espresso puck back to change our roasting style to help make our espresso extractions taste better. So, we must go forward before coming back.
With that analogy, and now coupled with a basic understanding of roast density, we move away from roasting and see how this roast density manifests in our ground coffee. Once coffee is ground, we term this ground coffee as “particle density”. As a group of particles in the context of espresso extraction, we term this puck density.
Particle and puck density will de the focus of our our next article.
See you soon.